
How to Set Up a VPS from Scratch: The Ultimate Guide

Upgrading to a Virtual Private Server (VPS) is a big step up from shared hosting, as now you have dedicated computing resources for your website which is a massive step up – however, with that comes more responsibility. The onboarding process can seem intimidating, which is why we came up with this guide on how to set up VPS server. This article will help you with every step of the way, including picking a plan, securing your server, and configuring it for whatever task you are intended to use it for. Following this guide will make the whole server setup and server configuration process simple, and easier even if it is for VPS for beginners.
Initial Steps: Choosing and Connecting
Before you can configure your server, it is important to get one and to understand how to access it. This section explains the first steps of choosing a provider and making your first connection!
Step 1: Choosing a VPS Provider and Plan
The first decision you’ll make in the VPS journey is to find a VPS provider and a hosting plan suitable to your requirements. Understand that this choice will affect how the server performs, and what it will or will not ask you to manage, as well as affecting your budget. Luckily, before you have to compare CPU cores, and the number of gigabytes of RAM, you first need to choose a more fundamental option that really defines your role as a user of the server: will you be responsible for the server software and security, or will you pay the provider to do all the technical work for you?
This is the main difference between the two types of VPS hosting, and it’s the most important thing to understand before you choose a plan.
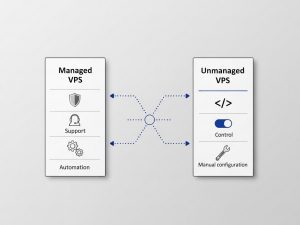

Managed vs. Unmanaged VPS: What’s the Difference?
One of the most important distinctions to understand is between a managed VPS and an unmanaged VPS.
- Unmanaged VPS: This is the most typical and cheapest way to get a VPS. An unmanaged VPS is where the provider only hires and manages the hardware and the network’s availability. You, the user, are responsible for everything else: installing the OS (it’s usually pre- installed), applying security patches, installing software, configuring the firewall, troubleshooting, etc. This is the option where you are in control of everything and is a great way to learn server administration. This is the option for you if you are technically savvy and want to manage the server configuration. Most of the guides on how to set up a VPS expect you are using an unmanaged server.
- Managed VPS: With a managed VPS plan, the hosting provider does most of the heavy lifting for you. They will be responsible for the initial server setup, software updates, security monitoring, technical support, etc. This option is great for business owners or people with a busy schedule who do not have the technical capability or time to manage their own server but would still like the benefit of dedicated resources that a VPS offers. You pay for the peace of mind although it does come at a premium price.
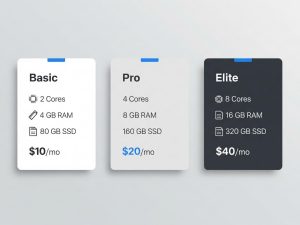
Factors to Consider When Choosing a Plan
The next step is to choose a plan once you have made a decision on managed versus unmanaged VPS. Here are elements to watch for:
- CPU (Central Processing Unit): You can think of the CPU as the brain of your server. The number of cores you decide on will determine how many concurrent tasks your server can handle. For example, if you are running a simple blog or personal website, a single core typically suffices. However, if you are running an e-commerce store, you will want a minimum of two cores or more to ensure enough power. Most larger web applications or game servers should have eight or more cores.
- RAM (Random Access Memory): RAM is the short-term memory of your server. RAM is essential for performance as it stores the data of the currently running applications. A server can be slow if it lacks RAM, especially when the server is under load. 1-2 GB of RAM is probably a good starting point for a simple style website. Conversely, a game server or an application that has deeper databases may need 4 GB, 8 GB or more.
- Storage: This refers to the hard drive space (HDD) of your server. You will have to decide between a traditional Hard Disk Drive (HDD), a Solid-State Drive (SSD), or an NVMe SSD. While HDDs provide more space for the dollar, the load time and overall server responsiveness using an SSD will be considerably quicker. For the majority of use cases, we highly encourage the performance used with SSDs.
- Operating System (OS): The Operating System is the core software your server runs on. You’ve basically got two main choices: Linux or Windows.
- Linux: For most web servers and developers, Linux is the obvious option. It is stable, open-source (free), and secure. Most web technologies and control panels are designed to run on Linux. Ubuntu is probably the most user-friendly distribution.
- Windows Server: You will need a Windows VPS if you want to run applications that are specifically for Windows, such as ASP.NET websites, Microsoft SQL Server, or if you want a familiar graphical desktop interface for remote access. Windows Server licenses will add to the price of the VPS plan.
When you are ready to make a decision, you can buy VPS hosting that meets those resource specifications.

Step 2: Connecting to Your VPS
Once you have purchased your plan, the server credentials will be sent to you in an email by your provider. This email will contain the IP address, a username (typically root for Linux or Administrator for Windows), and a password.
Now that you have your credentials, you can make your first connection. The most common question is “How do I connect to my VPS?” There are two primary answers, and the answer you use will depend on your server’s operating system.
- On a Linux server, the standard for remote access is to connect with SSH (Secure Shell), which gives you a secure command line interface.
- On a Windows server, you will use Remote Desktop Protocol (RDP) to access and experience a more familiar graphical desktop.
We will review both methods in detail. Let’s start with the most common way for web hosting and development: connecting to a Linux VPS.
Connecting to a Linux VPS with SSH
The standard for and standard method of remote access to Linux servers is by SSH (Secure Shell). SSH provides you with secure, encrypted access to your server’s command line interface (CLI) through a terminal.
- From macOS or Linux: No extra software is required to use SSH. You will simply open the terminal application that is built into your OS. You can connect via SSH using this command:
Bash
ssh username@your_server_ip
For your first connection, you will use the root user:
Bash
(Replace 192.168.1.100 with the actual IP address of your server). The system will ask if you trust the host: type yes and hit Enter. Afterward, type in the password that your host provided. You will not see the cursor move while you type in the password as a security feature. Hit Enter again, and you will be logged in to the command line of your server.
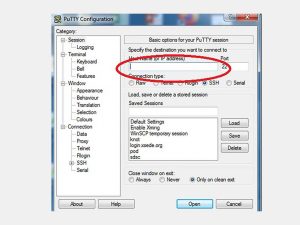
- From Windows: Windows now has its own built-in OpenSSH client, so you can use the same ssh command from either PowerShell or the Command Prompt. Historically, PuTTY has been a popular, easy-to-use alternative for many decades as a free SSH client.
- Download and install PuTTY.
- Open the application.
- In the “Host Name (or IP address)” field, fill in your server’s IP address.
- Confirm that “Port” is set to 22 and that the “Connection type” is SSH.
- Click “Open”.
- A terminal window will pop up. You will be asked for a username (root) and then a password.
If you were able to connect successfully, you now own your server and have complete control! This is the first big step of your journey to learn how to connect to a VPS server.

Connecting to a Windows VPS with RDP
If you chose a Windows VPS, you will be connecting using the Remote Desktop Protocol (RDP) which allows a complete graphical desktop experience as if you were in front of the machine.
- On your local Windows machine simply search for “Remote Desktop Connection” and open that app.
- In the “Computer” field, enter the VPS’s IP address and click “Connect”.

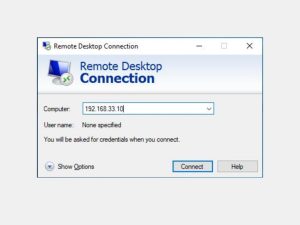
- You will be prompted for your credentials. Click on “More choices” and “Use a different account.”

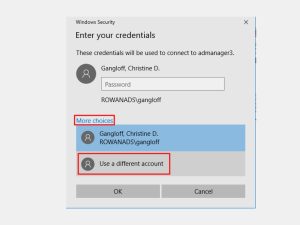
- Enter the username (usually called Administrator) and the password from your provider.
- You may see a certificate warning; it’s safe to accept this and continue.
- You will see your Windows Server remote desktop and now you can enjoy a complete visual interface for your server configuration.
Essential Configuration and Security
Once you’re connected, you are in the next phase which is critical. An unconfigured server is a vulnerable one. These initial steps are essential for any server configuration. They are basic security best practices.
Step 3: Performing Initial Server Configuration
You will want to do some basic housekeeping before installing applications. These are important steps to help turn security is non-standard into appropriate and industry best practice.
-
Update Your System (Linux)
The very first thing to do on a new Linux server is to update the installed software packages. Updating the software packages provides the latest issued security patches and bug fixes.
For Debian-based systems, for example Ubuntu, the first thing to do is run these two commands:
Bash
sudo apt update
sudo apt upgrade -y
- sudo apt update: This command downloads the latest package lists from the software repositories, letting your system know what new versions are available.
- sudo apt upgrade -y: This command actually downloads and installs the updates. The -y flag automatically answers “yes” to any prompts.
This simple action is a cornerstone of good user management and server maintenance.
-
Create a Non-Root User
Logging in as the root user gives you absolute power over the system. A single typo could accidentally delete critical files. For this reason, it’s a vital security practice to create a new user that is not root for daily activities; and then give that user sudo access to run administrative commands, when necessary, with sudo. This will protect you from making an accidental mistake that could damage the system
- Create the new user: (Replace myuser with your desired username)
Bash
adduser myuser
You will be prompted to create a strong password and fill in some optional information.
- Grant administrative privileges: Add the new user to the sudo group.
Bash
usermod -aG sudo myuser
- Log out and log back in: Now, exit your root session (exit) and reconnect via SSH using your new user:
Bash
ssh myuser@your_server_ip
Moving forward, you should always use this new account. If you need to run an administrative command, just put sudo in front of the command (e.g., sudo apt update). This principle applies to Windows as well; always use a standard user for normal everyday tasks rather than the main Administrator account when using a remote desktop.
Step 4: Securing Your VPS
Answering the question, “how to secure a VPS?” is not a simple answer, but has different layers. A default server setup is not secure enough for the public internet. The next steps outlined below are non-negotiables to prevent your server from being attacked automatically and accessed without authorization.

-
Set Up a Firewall
A firewall is a digital wall that controls your incoming and outgoing network traffic. It serves as a gatekeeper, only allowing connections on ports that you explicitly open. A popular and easy-to-use firewall for Ubuntu is UFW (Uncomplicated Firewall).
- Check UFW’s status: It’s usually installed but inactive by default.
Bash
sudo ufw status
- Set default rules: First, deny all incoming traffic and allow all outgoing traffic. This is a secure starting point.
Bash
sudo ufw default deny incoming
sudo ufw default allow outgoing
- Allow essential connections: You must allow SSH traffic, otherwise you will be locked out of your server. You should also allow HTTP and HTTPS if you plan to host a website.
Bash
sudo ufw allow ssh # Or ‘sudo ufw allow 22’ for the default port
sudo ufw allow http # Or ‘sudo ufw allow 80’
sudo ufw allow https # Or ‘sudo ufw allow 443’
- Enable the firewall:
Bash
sudo ufw enable
It will warn you that this may disrupt existing connections. Type y and press Enter. Your firewall is now active and protecting your server.
-
Use SSH Keys for Authentication
Brute-force attacks are capable of cracking passwords. A more secure method of logging in is to use SSH keys. This method, called public key authentication, uses a pair of cryptographic keys: a private key that stays on your local computer and a public key you place on your server. The server will only let you in if you have the corresponding private key.
- Generate a key pair on your local machine: Open a terminal on your Linux/macOS computer or Git Bash/PowerShell on Windows.
Bash
ssh-keygen -t rsa -b 4096
Press Enter to accept the default file location and optionally set a passphrase for extra security. This will create two files, usually id_rsa (your private key) and id_rsa.pub (your public key), in a hidden .ssh directory in your home folder.
- Copy the public key to your server: The easiest way is with the ssh-copy-id command.
Bash
ssh-copy-id myuser@your_server_ip
It will ask for your user’s password one last time. This command automatically appends your public key to the ~/.ssh/authorized_keys file on the server.
- Test the key-based login: Try logging in again.
Bash
ssh myuser@your_server_ip
This time, it should log you in without asking for a password (or it will ask for your key’s passphrase if you set one).
- (Optional but Recommended) Disable Password Authentication: After you verify that key-based login works, you can disable password logins altogether for maximum security.
- Open the SSH configuration file on your server: sudo nano /etc/ssh/sshd_config
- Find the line PasswordAuthentication yes and change it to PasswordAuthentication no.
- Save the file (Ctrl+X, then Y, then Enter).
- Restart the SSH service: sudo systemctl restart sshd
Now, the only way to log into your server is with a valid SSH key, dramatically improving its security. This is a critical step in learning how to secure a VPS.
Tailoring Your VPS for Specific Needs
With a secure, updated base server, you can now configure it for its intended purpose. Below are guides for three of the most standard use cases.
How to Set Up a VPS for a Website?
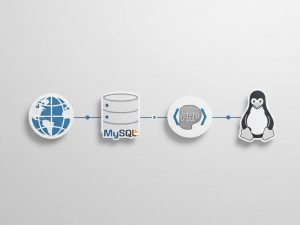

One of the most popular uses for a VPS is hosting one or more websites. This involves installing a web server and other necessary software. A common software stack includes LAMP (Linux, Apache, MySQL, PHP) or LEMP (Linux, Nginx, MySQL, PHP).
Here’s a quick guide on how to set up a VPS server for a website using the LEMP stack on Ubuntu:
-
Install Nginx (the Web Server):
Bash
sudo apt install nginx -y
Now, you will need to adjust your firewall to allow traffic to Nginx.
Bash
sudo ufw allow ‘Nginx Full’
You can now visit your server’s IP address in a web browser, and you should see the default Nginx welcome page.
-
Install MySQL (the Database Server):
Bash
sudo apt install mysql-server -y
After installation, run the security script to set a root password and remove insecure defaults.
Bash
sudo mysql_secure_installation
-
Install PHP (the Programming Language):
Bash
sudo apt install php-fpm php-mysql -y
This installs PHP and the necessary module to communicate with your MySQL database.
-
Configure Nginx to Use PHP:
You need to edit the Nginx server block (virtual host) file to tell it how to process PHP files. This involves pointing it to the PHP-FPM socket.
-
Set Up Your Domain Name and DNS:
- You will have to change the DNS records from your domain registrar’s control panel.
- Make sure to create or update the ‘A’ record for your domain (e.g., example.com) and your www subdomain (www.example.com) to point to your VPS’s IP address.
- After you change the DNS settings, you will see the changes in a few minutes, but it could take up to 48 hours to propagate all over the internet.
Once you complete these tasks, you can upload your website files (e.g., WordPress or a custom application) to the appropriate directories on your server (usually /var/www/html), and it’ll be live on the internet.
How to Set Up a VPS for Gaming?


A VPS is a great option for hosting a game server privately for you and your friends. Since most VPS plans give you dedicated resources, thus, you get a smooth low latency experience, that you can’t get using shared hosting or running the server hosted on your gaming computer. The process of how to set up a VPS for gaming typically looks like this:
- Choose a High-Performance VPS Plan: Game servers demand a lot of RAM and CPU. Choose a VPS plan with a high clock-speed CPU (at least 2-3 GHz) and RAM sufficient to meet the demands of the game and the number of players. For example, in a game like Minecraft, you would want to start with at least a VPS providing 4 GB of RAM for a small group.
- Prepare the Server: You can connect to the VPS via SSH and perform the initial server setup security steps described above. Here is where you may want to set up a firewall.
- Open Game-Specific Ports: Server players connect to games via specific available network ports. For example, Minecraft: Java Edition’s default server uses port number 25565. You could then add a firewall rule that opens this port number:
Bash
sudo ufw allow 25565/tcp
- Install Game Server Software: The installation process is highly variable by game.
- For Minecraft: You will first need to install Java (sudo apt install default-jre). Afterwards, you can download the official server .jar file from the Minecraft website. You would run it using a command like java -Xmx2G -Xms2G -jar server.jar nogui. The best practice would be to run the game server in either a screen or tmux session. This way, you’ll keep the session active even after you disconnect from SSH.
- For other games (Valheim, Counter-Strike, etc): Many people use a utility called LinuxGSM (Linux Game Server Managers). This automation tool helps with the installation, updating, and management of hundreds of other game servers.
When you are able to complete these steps, you will have established a relatively stable, private environment for your gaming sessions while being able to utilize the VPS’ dedicated resources. This is the essence of the inquiry of “how to set up a VPS for gaming?“.
How to Set Up a VPS for Remote Desktop (Windows)?
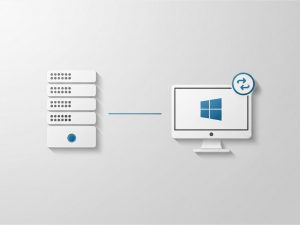

For users who need a persistent, accessible Windows environment, learning how to set up a VPS on Windows for remote desktop use is invaluable. This is the ideal environment to run specific Windows software 24/7, for remote assignments, or as a secure private cloud for file storage.
The process of setting up a VPS for remote desktop is relatively simple because Windows Server comes with RDP enabled by default.
- Purchase a Windows VPS: During the checkout process, select a version of Windows Server (e.g., Windows Server 2019 or 2022).
- Get Your Credentials: Your provider will email you the IP address, the username (Administrator), and a password.
- Connect via RDP: As detailed in Step 2, open the “Remote Desktop Connection” client on your local PC, enter the IP, and log in with the provided credentials.
- Initial Configuration:
- Change Password: The first thing you should do is change the default Administrator password to something unique and strong.
- Install Updates: Run Windows Update to ensure your system is fully patched and secure.
- Create a Standard User: Just like on Linux, it’s a good practice to create a non-administrator user account for your daily remote desktop sessions.
After connecting, you will have the entire Windows desktop ready for you to use. You can install any software you like; for example, web browsers, office suites or other specialized business applications. You have the benefit of secure access to your files on the VPS from any computer that has an RDP client, which makes it a very powerful way to gain productivity and access remotely.
Answering User Questions and Conclusion
Let’s answer some frequently asked questions from those just beginning this process.
Is a VPS hard to set up?
That depends on your level of comfort with technology. If you have never used a command line before, there is a bit of a learning curve. The upside is that the process is logical and well-documented. It shouldn’t be a problem for anyone to complete the initial server setup and a little bit of basic security hardening, with a detailed step-by-step guide similar to the one provided here. The initial setup may feel a little overwhelming, but as you make progress, you’ll gain experience and confidence in your ability. So, while initial setup is more involved than a shared hosting setup, it is certainly a skill most people can acquire rather easily.
What do I need to set up a VPS?
You only need three items to begin:
- An active VPS plan from a hosting provider.
- Your login credentials (IP address, username, password) which your provider will email to you.
- A connection tool on your computer. This is typically the built-in Terminal for connecting to a Linux VPS from a Mac, PuTTY for connecting from Windows, or the Remote Desktop Connection app for any Windows VPS.
How long does it take to set up a VPS?
Let’s break down the setup time into four distinct phases:
- Provisioning (About 5 minutes): Once you buy a plan, the provisioning is handled automatically by your host. Before you can even finish a cup of tea, your VPS will be online and ready for you to access.
- Initial Connection and Updates (10-15 minutes): This phase is all about logging in for the first time and making sure your server’s software up to date. The initial connection and updates are simple and important first steps.
- Basic Security Configuration (30-60 minutes): Don’t skip this part. The basic security configuration is your first line of defense. This involves tasks like setting up a firewall and stronger logins with SSH keys. If you’re new to this, give yourself up to an hour to get it right.
- Application Installation (Varies): This is the “it depends” phase. The application installation is where you put your software on the server. Setting up a simple website is quick, but setting up a custom application or game server will naturally take more time.
In total, you should plan for about 90 minutes to become fully secured and set up a running server.
Final Takeaway
Setting up a VPS for the first time puts you in control. It’s the difference between borrowing a corner of a shared space and being the architect of your own environment. A proper server setup and server configuration is your ticket to unlocking the true power of dedicated resources, giving you a major boost in performance, security, and freedom.
Yes, the command line can seem intimidating, but it’s not as complex as it looks. It’s a step-by-step process that anyone can learn. Starting with a basic unmanaged plan is the perfect training ground for picking up server administration skills that are useful everywhere.
You’re now ready to find your server, log in, and build whatever you want. by Mixal The control is all yours.